
I'm so glad to have wrapped up my most recent pattern for the Star Sighting quilt. I've now made this quilt a total of four times and each result is very different.
Using both custom quilting and allover designs, I wanted to show you not only how different the quilt can look in different color ways, but also with different quilting styles. Let's take a look!
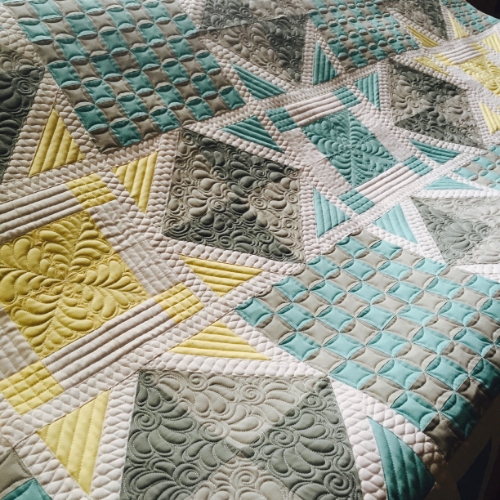
Example #1

This was the first Star Sighting quilt I made, before the pattern even had its name. I do want to mention that this prototype is slightly different than the finished pattern in that the centers of the stars are different. I played around with having the coloring and orientation of the inside-star patches be directional, but in the end I didn't think there was a big enough visual impact for the amount of attention it required.
In the "checkerboard" sections, I quilted 1/4 inch inside each square, traveling continuously up and down the rows of squares vertically and then doing the same horizontally. For the star point areas, I used a ruler to help with the straight lines that echo and accentuate the shape of the triangular star points shown in purple.


One unique thing about this quilt pattern is how the white fabric (referred to in the pattern as the star contrast fabric) really sets off the star shapes, appearing to outline them. I played up these areas by adding texture-rich circles (sometimes called pebbling). In order to make the circles smaller and therefore allowing me to be more consistent with the shape, I first "outlined" the white, quilting approximately 1/4" inside both edges.
Perhaps my favorite quilting part of this first example is in the gray diamond shapes between the stars (referred to as the background in the quilt pattern). This is a quilting motif I developed based on many other techniques: spirals, concentric circles, pebbling, feathers, echoing. I would definitely consider this an advanced technique! Here's a link to a video where I draw this design out on a whiteboard. As a longarmer, it's very helpful to me not only to see how other quilters create the shapes but also how to travel around the design to fill areas.
Example #2
Now, let's look at the second quilt I made using the Star Sighting pattern. Like the first, it's heavy on the custom quilting! It's worth mentioning that I changed the patchwork inside the blue and yellow stars for this quilt -- a change that stuck and made it to the written instructions.


Drilling down our view to the inside of the star, you'll notice that I used straight lines in the outer portion of this patchwork to draw the eye into the center of the star. I love to use contrast by juxtaposing straight lines next to the curvy ones, like with the feathers here.
If you'd like to see how I quilt the "four-patch feathers" shown above, here is a quick drawing video I recorded.
For the star points, I used diagonal lines to enhance the shape and encourage the eye to travel out when looking at the quilt. If using a longarm machine to do free motion quilting, I'd highly encourage using a ruler (and ruler base) to make the straight diagonal lines.
Again in this quilt, I used white as my star contrast fabric. The quilting motif used here is often called ribbon candy. I have a video of myself drawing a modified ribbon candy design - to get a result like the one shown in this quilt example, you would just stop after making the pass, not backtracking to add more detail (as shown in the video).
In the background areas (the gray fabrics), I quilted this spiraled feather quilting motif (video link).
And last but not least, the checkerboard quilting was extremely easy to accomplish given that the squares are the only guides you need. Karen at Redbird Quilt Co. has a really nice video for accomplishing this orange peel quilting motif.
Example #3
And now I'd like to share some easy-peasy allover quilting and what it looks like on the Star Sighting quilt.

Straight line quilting can be *just the thing*! I love how it unifies the quilt top and gives a modern look. Straight line quilting is an extremely useful skill to hone as it can be used with great success and in varying density on almost any quilt. It's so domestic sewing machine friendly, just make sure you have a good walking foot. Megan of Canoe Ridge Creations has a fantastic tutorial on straight line quilting if you're interested in reading more.

These lines are approximately 1/4" apart and if you look closely, you'll notice that my line spacing is not perfect. You'll also notice that the overall look is not compromised in the slightest!

Example #4
The most recent Star Sighting quilt that I completed uses another allover quilting technique, maybe a little more involved than straight line quilting, but also lends great texture and interest: woodgrain quilting. It's a favorite of mine!

I think woodgrain quilting is just so much fun to execute because it's very difficult to mess it up! I also recorded a video of myself drawing this design out on a whiteboard:
**Confession relating to the video above: since recording it, I've gotten used to quilting from the top down. I think it's a little more work to quilt from the bottom up as far as rolling goes, but I also think it's easier to echo on top of quilting lines rather than below them. It's nice to have options and ultimately to have more tools in your quilter's tool box!

I hope these quilting-focused photos will help inspire you when deciding how to quilt your own Star Sighting quilt!
If you still need to get the pattern, it's available for purchase here.